- Getting Started
- Backup Console
- Management Console
- Windows Backup
- Mac Backup
- Linux Backup
- Mobile Backup
- Cloud Applications Backup
- Server Cloud Backup
- Mass Deployment
- Entire Machine Backup
- Google Drive Backup
- IDrive® 360 Express
- Single Sign-On
- System Requirements
- Account Management
- Security
- Firewall Guidance
Windows
If your question is not addressed below, contact us through our support form and we will get back to you shortly.
Backup via Full Client
- How do I sign in to the IDrive® 360 desktop application?
- What is the difference between the thin client and full-suite desktop application in IDrive® 360?
- When I sign in to my IDrive® 360 account for the first time on a machine, I notice that some folders have already been scheduled for backup. Why?
- I see some files/folders are excluded from backup. How do I include those in the backup set?
- How do I take an immediate backup of my data?
- Can I immediately back up files and folders on my computer without launching the desktop application?
- How do I schedule an online backup?
- Is it possible to schedule a backup to a local drive and continue backing up to my IDrive® 360 account?
- Is there a way to get an alert if my backup fails?
- What happens if my backup set contains files/folders that have insufficient access rights?
- Can I control tray options for IDrive® 360 on my computer?
- How do I manage my scheduled backup jobs?
- Can I view the status of my scheduled backups?
- How does the IDrive® 360 desktop application optimize data transfers?
- How can I exclude certain files/folders from being backed up?
- What is Bandwidth Throttle?
- Can I change CPU utilization for my backups using the full-suite application?
- Can I back up Mapped/USB/External drives?
- How do I back up data to a mapped drive using the IDrive® 360 desktop application?
- How do I update authentication credentials for a mapped drive?
- How do I add a network path to my backup set?
- How can I add a mapped drive?
Restore via Full Client
- How do I restore my data after a system crash or on a new computer?
- How does 'Restore to original location' differ from a standard file restore?
- Can I restore files backed up from external drives or mapped drives using the 'Restore to original location' option?
- Can I use drag-and-drop to restore files from the IDrive® 360 desktop application?
- What is Versioning? Does it impact the available quota (storage space in my account)?
- How do I view the versions of a file stored in my account?
- How do I restore the latest version of a file in my account?
- How do I delete backed-up data?
- I have backed up data from multiple computers. How do I restore it?
- Can I search and restore a particular file from my IDrive® 360 account?
- I can see a 'Snapshots' button on the Restore menu. What is it?
- How do I restore the data backed up on a local drive or Express device?
General
- Can IDrive® 360 desktop application back up my OneDrive folder?
- Does IDrive® 360 desktop application support the backup of BitLocker-enabled drives?
- Does the IDrive® 360 desktop application perform scheduled backups in 'Standby' mode?
- Will the IDrive® 360 desktop application back up my data even if the computer is logged off?
- I am unable to open my Outlook email client during the backup of my Outlook PST files. I get an error indicating that the file may be in use. Why?
- Will a missed scheduled backup run when the computer is restarted after the scheduled time?
- Do I need to restart my computer after installing the IDrive® 360 desktop application?
- Can the IDrive® 360 desktop application work with virtual machines?
- What is Archive Cleanup?
- I received an email warning about exceeding the quota limit. How do I adjust my account storage usage?
- I received a Windows SmartScreen message when attempting to install the IDrive® 360 desktop application.
- Does the IDrive® 360 desktop application remove my account files when they are deleted from my computer?
- I deleted files from my IDrive® 360 account. Can I restore the files or folders that were accidentally deleted?
- If I keep on performing backups, will I use up my quota quickly?
- Can I halt my backups at a particular time?
- Does IDrive® 360 support backup and restore of large files?
- How do I view my backup/restore activities via the application?
- I need a walkthrough of the IDrive® 360 desktop application interface.
- What options are available in the IDrive® 360 desktop application Tray?
- I am receiving a backup notification stating 'Success' even though the log details contain 'permission denied' error on files and folders. Why?
- If I overwrite the IDrive® 360 desktop application with the latest version, will ongoing backups and restores be retained?
- How do I uninstall the IDrive® 360 desktop application from my computer?
Thin Client
- Can I back up my open/locked files?
- What is CPU throttle?
- Which system files are excluded from backup in Windows computers?
How do I sign in to the IDrive® 360 desktop application?
- Sign in to your IDrive 360 account.
- Click 'Add Devices'
 at the top right.
 - In the 'Add Devices' screen,
- Select Windows OS to download the setup file.
- Select the toggle to choose the encryption method for installation (default or private).
- Enable 'Use the full-suite desktop app'.
- Click 'Download Backup Agent' to download the installer.
- You may also share the installation link with others. They can download and install the setup for their operating system.
After installation, sign in to the desktop application using your IDrive 360 account credentials. Once signed in, you can configure backups, restore the backed-up data, manage settings, and schedules.
What is the difference between the thin client and full-suite desktop application in IDrive® 360?
IDrive 360 offers a thin client and a full-suite desktop application to configure your computers for backup. You can choose the application to install in the following ways:
- Enable the 'Use the full-suite desktop app' option under Settings in remote management
- During installation, you can enable the 'Use the full-suite desktop app' option in the 'Add Devices' screen.
- You can also choose to enable or disable the full-suite desktop app from the Computers tab.
Here is an overview of how the two backup agents work:
Thin Client Application
- Installs only the backup agent.
- Runs silently in the background after installation.
- No desktop interface is available for managing backups.
- Backup, restore, and configuration activities must be performed via the web console.
- Keep the 'Use the full-suite desktop app' toggle disabled to install the thin client.
Full-suite Desktop Application
- Installs the complete desktop interface on the computer.
- Lets you sign in and configure backups, restore data, manage settings, schedules, and view reports directly from the computer.
- The backup agent continues to run in the background.
- Enable the 'Use the full-suite desktop app' toggle to install the full-suite desktop application.
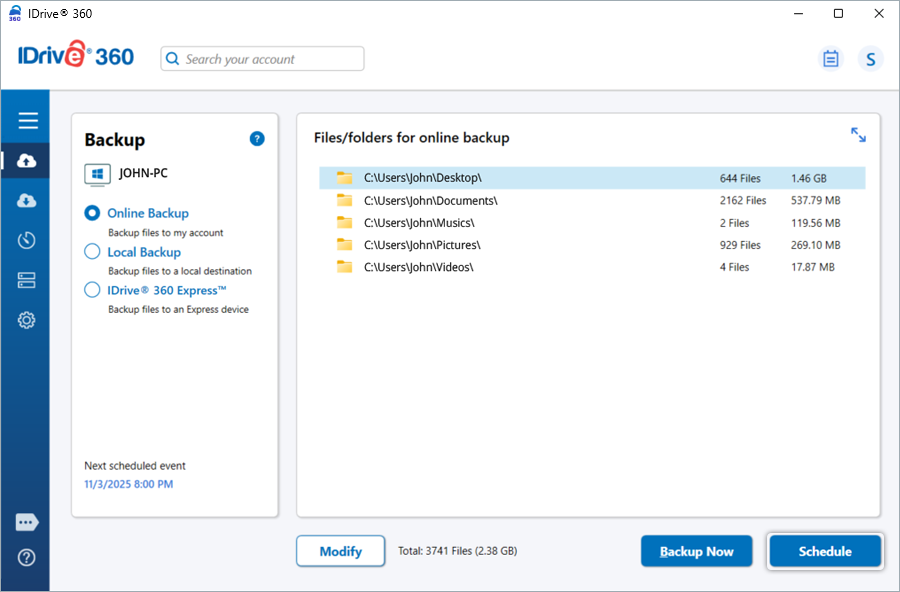
When I sign in to my IDrive® 360 account for the first time on a machine, I notice that some folders have already been scheduled for backup. Why?
The IDrive 360 Desktop application is an automated online backup solution. Hence, critical folders, such as Desktop, Documents, Pictures, Videos, and Music, are pre-selected for backup. If OneDrive is enabled on your computer, the OneDrive folder will be added to your backup set by default. If the pre-defined settings are not altered, the application commences the backup of the default backup set once the scheduled backup time is reached.
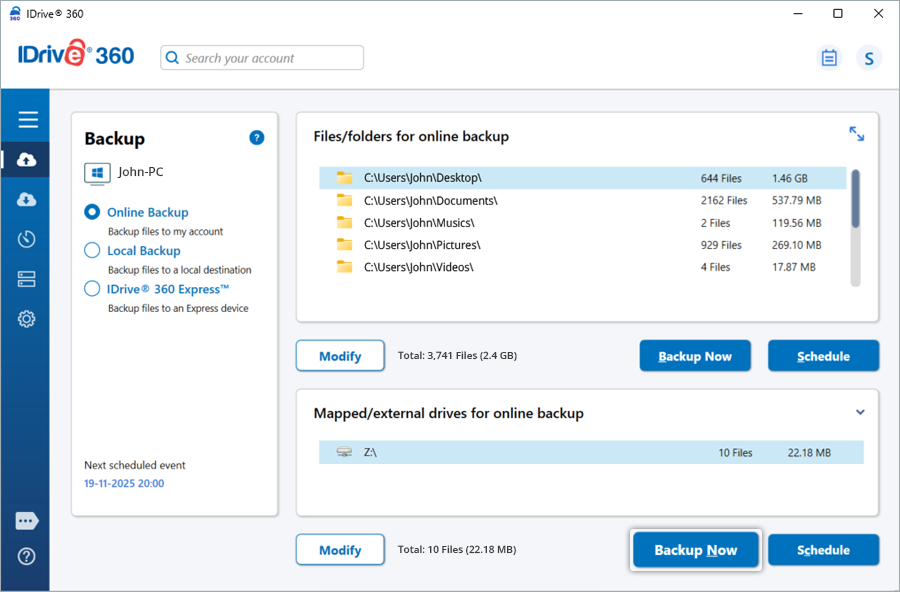
To back up the files/folders to your IDrive 360 account, select the 'Online Backup' radio button. Alternatively, select 'Local Backup' to back up the file(s)/folder(s) to your computer and 'IDrive® 360 Express™' to back up files/folders to an Express device. To change the files/folders/drives in a backup set, click the 'Modify' button on the respective screen.
Click the 'Backup Now' button to start an immediate backup.
To change the day, time, and frequency for the scheduled backup job, click the 'Schedule' button.
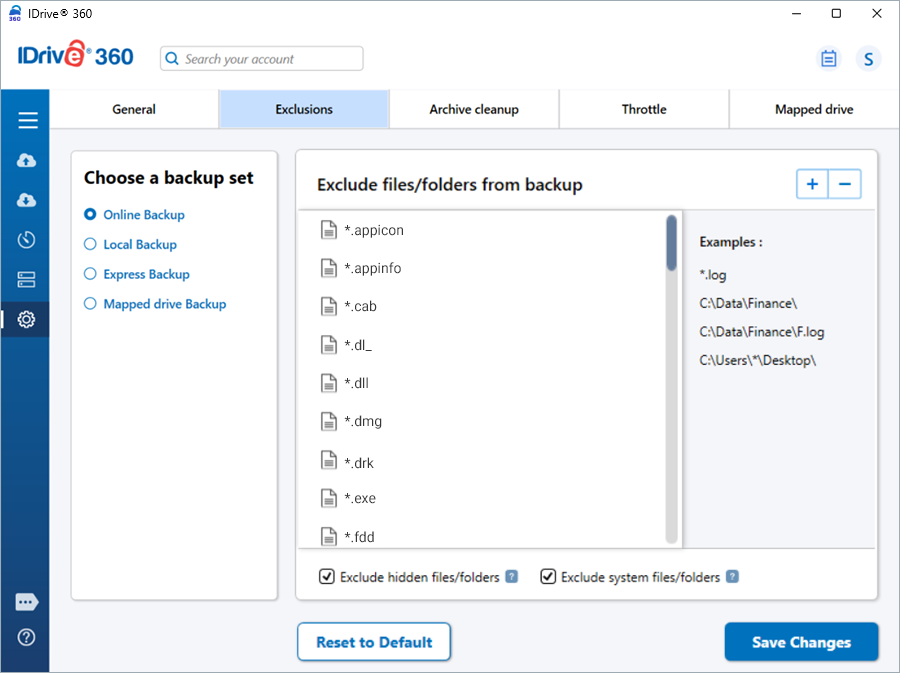
I see some files/folders are excluded from backup. How do I include those in the backup set?
The files/folders marked in red under the 'Select files/folders for backup' dialog box are excluded from backup.
To include them in the backup set,
- Go to 'Settings' and click 'Exclusions'.
- Select the files/folders that you want to back up and click
 .
. - Click 'Save Changes'.
How do I take an immediate backup of my data?
Select the desired files/folders/drives that you want to back up immediately by using the 'Modify' button. Once you make the changes, click the 'Backup Now' button.
Can I immediately back up files and folders on my computer without launching the desktop application?
Yes, you can back up files/folders without launching the IDrive® 360 desktop application. Select the files/folders you want to back up immediately using the File Explorer, right-click, choose IDrive® 360, and select 'Backup Now'. The application performs an immediate backup for the selected files and folders.
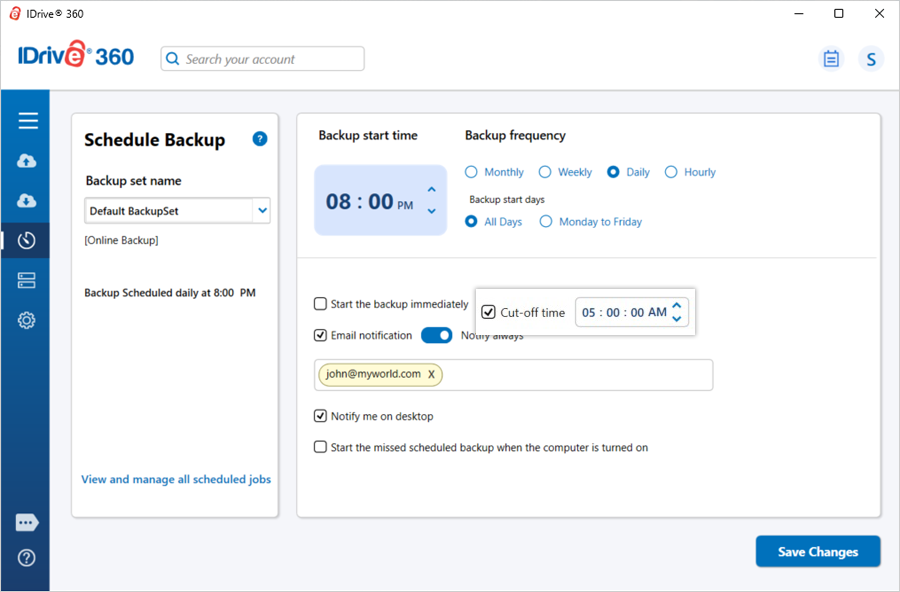
How do I schedule an online backup?
To schedule a backup, sign in to your IDrive 360 desktop application and click 'Scheduler'.
You can configure the backup schedule by setting the start time and selecting the desired backup frequency. Modify the following parameters and click 'Save Changes'.
- Backup set name: Select the backup set you want to schedule.
- Backup start time: Set the time at which the scheduled backup should begin.
- Backup frequency
Choose how often the backup should run:
- Monthly
- Weekly
- Daily
- Hourly
- Start the backup immediately: Run a backup job right away.
- Cut-off time: Set the time at which the scheduled backup should stop.
- Email notification: Enable email alerts for backup status and enter the email address for notifications.
- Notify always: Receive all backup notifications.
- Notify me on desktop: Enable desktop notifications for backup updates.
- Start the missed scheduled backup when the computer is turned on: Resume a scheduled backup that was missed because the machine was powered off.
Is it possible to schedule a backup to a local drive and continue backing up to my IDrive® 360 account?
Yes, you can schedule a local backup to a drive and an online backup to your IDrive® 360 account as two separate jobs. However, it is not possible to combine local and online backup in a single scheduled job.
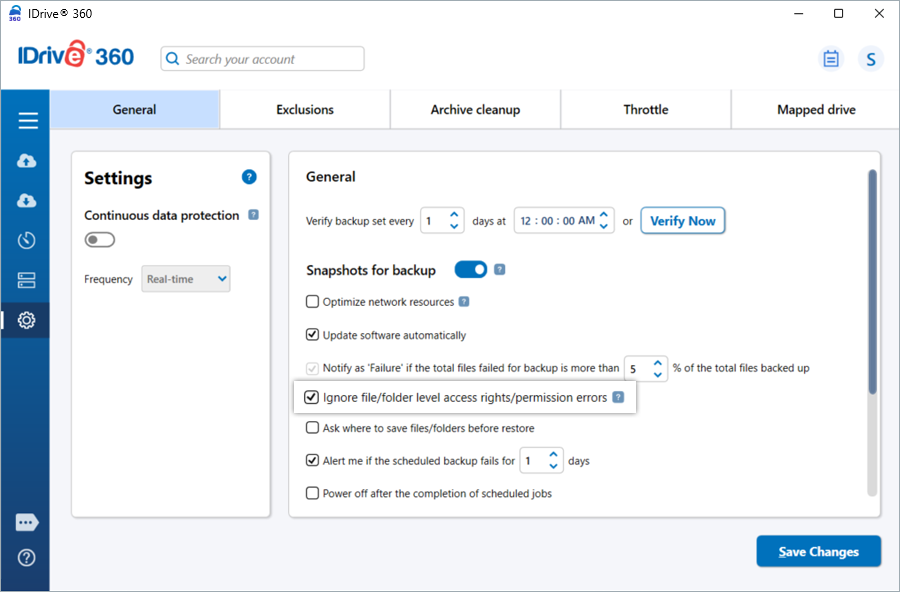
Is there a way to get an alert if my backup fails?
Yes, to receive an alert in case of backup failure, select the required parameters for the following options from 'Settings' > 'General'.
- Select the number of days in the 'Alert me if the scheduled backup fails for 1 day' option to receive a desktop alert, in case your backup has not taken place.

- Select the percentage in the 'Notify as 'Failure' if the total files failed for backup is more than 5% of the total files backed up' option, to receive a desktop alert on backup failures.
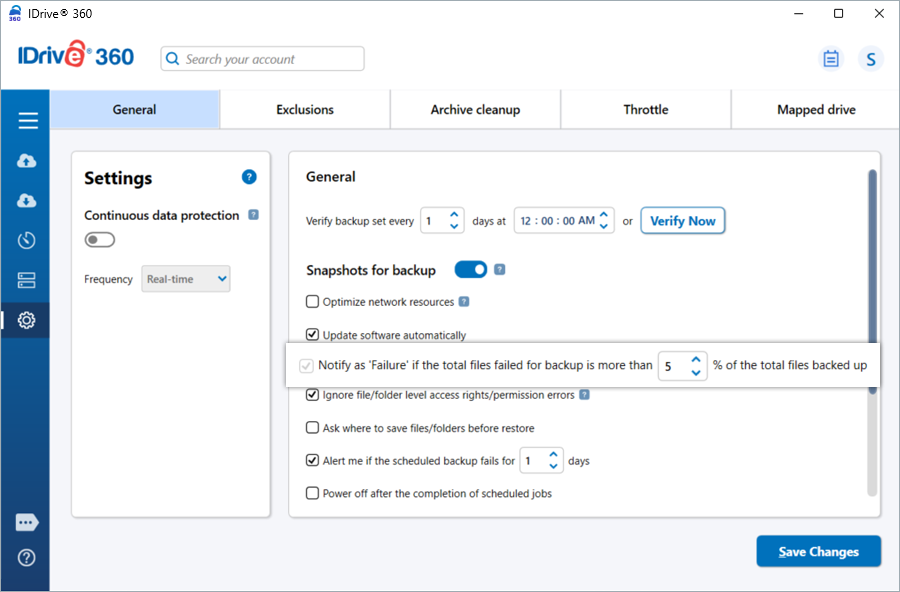
What happens if my backup set contains files/folders that have insufficient access rights?
Even if files or folders in your backup set have insufficient access rights, IDrive® 360 will still back them up.
However, in case of files/folders in mapped drives that have insufficient access rights, IDrive® 360 will not back them up by default. In such a case, your backup summary will read 'Failure'.
To ignore file/folder level access rights/permission errors for mapped drives,
- Go to 'Settings' > 'General'.
- Select the 'Ignore file/folder level access rights/permission errors' option.
This will ignore any access rights/permission errors on any mapped drive files or folders that are part of your backup set.
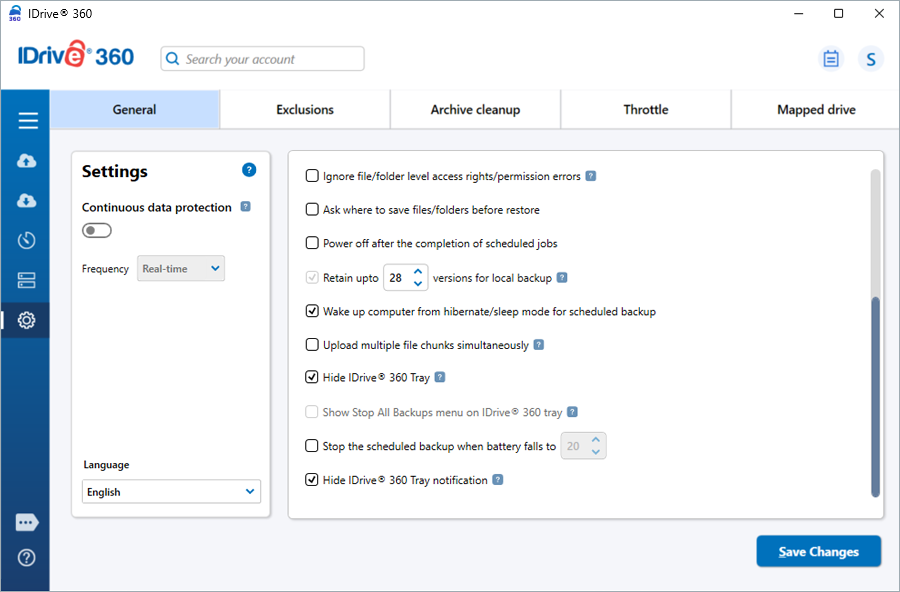
Can I control tray options for IDrive® 360 on my computer?
Yes, you can control the tray behavior of IDrive® 360 from 'Settings' > 'General'.
The following options are available:
- Hide IDrive® 360 Tray: Select this option to hide the IDrive® 360 tray icon from the system tray.
- Show Stop All Backups menu on IDrive® 360 Tray: Select this option to display the 'Stop All Backups' option in the tray menu on your computer. This option is applicable only when the tray icon is visible.
- Hide IDrive® 360 Tray notification: Select this option to stop tray notifications from being displayed on your computer.
How do I manage my scheduled backup jobs?
You can manage all scheduled backup jobs from the 'Scheduler' within the application.
- Click 'View and manage all scheduled jobs'.
- To edit a job, select it, update the time, day, or other settings, and click 'Save Changes'.
- To delete a job, select it, click
 , and confirm by clicking 'Yes'.
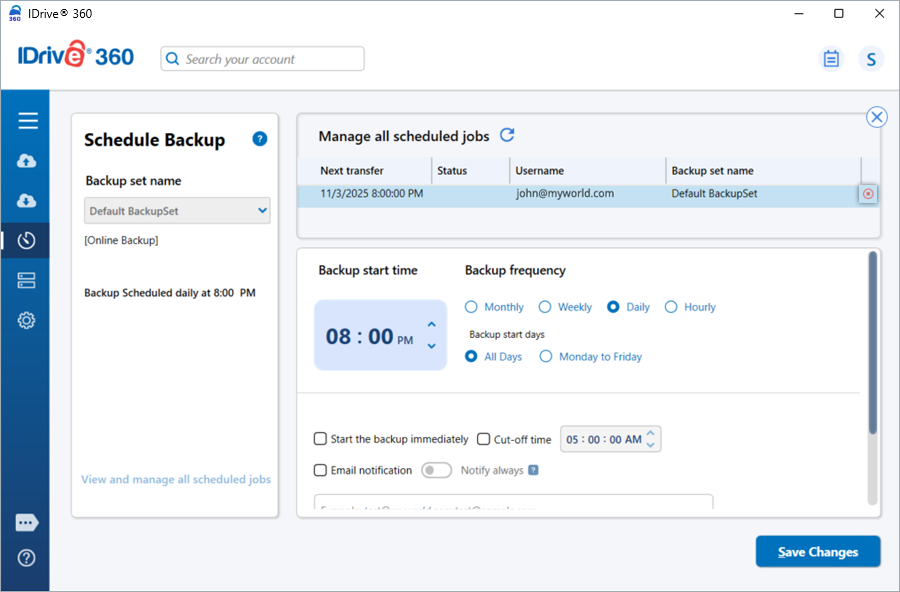
Can I view the status of my scheduled backups?
Yes, you can check your scheduled backup activities using the following methods:
Logs: Right-click the IDrive 360 desktop application tray icon and select 'View Logs'. This gives you access to detailed session-wise log files of your backup activities, including completed and failed files, along with information about the last backup and next scheduled run.
Status screen: Click 'Status' from the IDrive 360 desktop application tray icon to view the status of your next scheduled backup jobs.
How does the IDrive® 360 desktop application optimize data transfers?
The IDrive® 360 desktop application transfers only the modified portions of files after the initial full backup, reducing bandwidth usage and speeding up transfers. This optimization applies to backups, restores, and Sync operations, making data transfer efficient and faster.
How can I exclude certain files/folders from being backed up?
To exclude files/folders from being backed up,
- Go to 'Settings' > 'Exclusions'.
- Click
 under 'Exclude files/folders from backup'.
 - Click
 to browse the files/folders from the list.
 - Select the desired files/folders to add and click 'OK'. The files/folders will be added to the exclusion list.
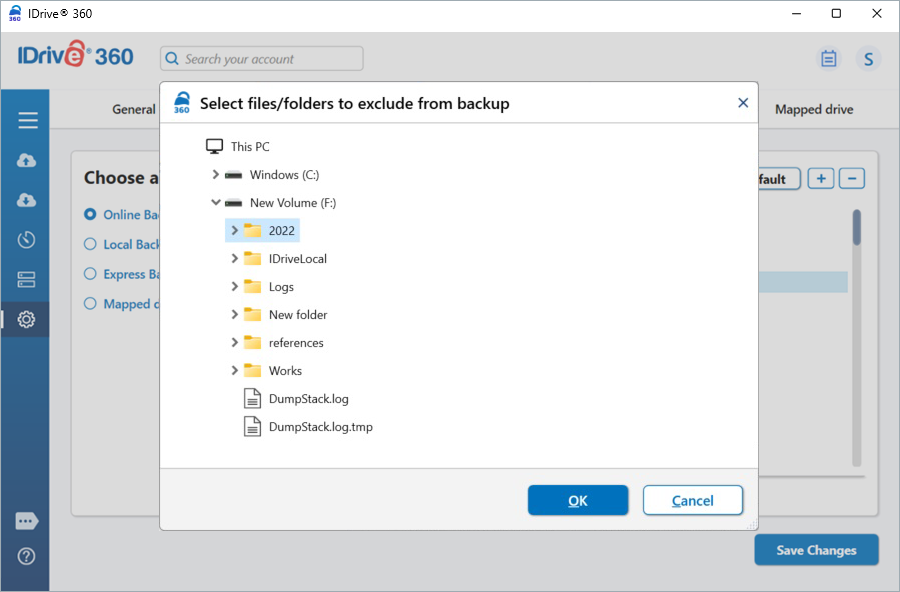
- Click 'Save Changes'.
The selected files/folders will be excluded from being backed up.
The Bandwidth throttle lets you control the Internet bandwidth used by the IDrive® 360 desktop application for backups. By default, it is set at 100%.
You can enable the 'Auto-pause' under 'Settings' > 'Throttle' > 'Bandwidth throttle', which intelligently adjusts bandwidth during backup operations to ensure smooth PC performance.
- PC in use: Limits bandwidth when the computer is in use (default 25%), allowing other applications to run without hindrance.
- PC not in use: Allows maximum bandwidth when the computer is idle (default 100%).
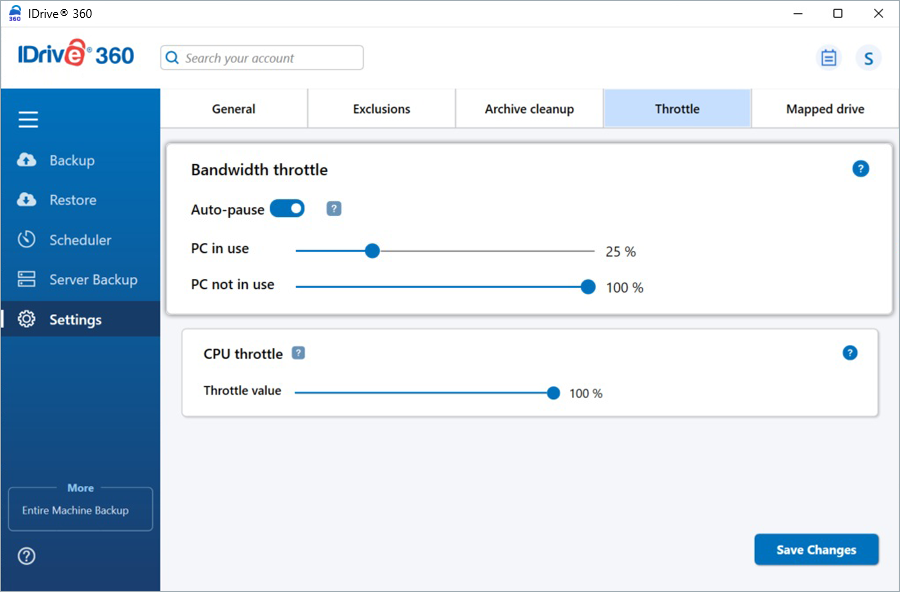
Can I change CPU utilization for my backups using the full-suite application?
CPU throttle lets you set the CPU usage for backups. You can change the CPU utilization to suit the workload of your computer. By default, the CPU throttle value is set at 100%.
To change the CPU throttle settings,
- Go to 'Settings' > 'Throttle' > 'CPU throttle'.
- Use the slider to set the CPU to be used, and click 'Save Changes'.
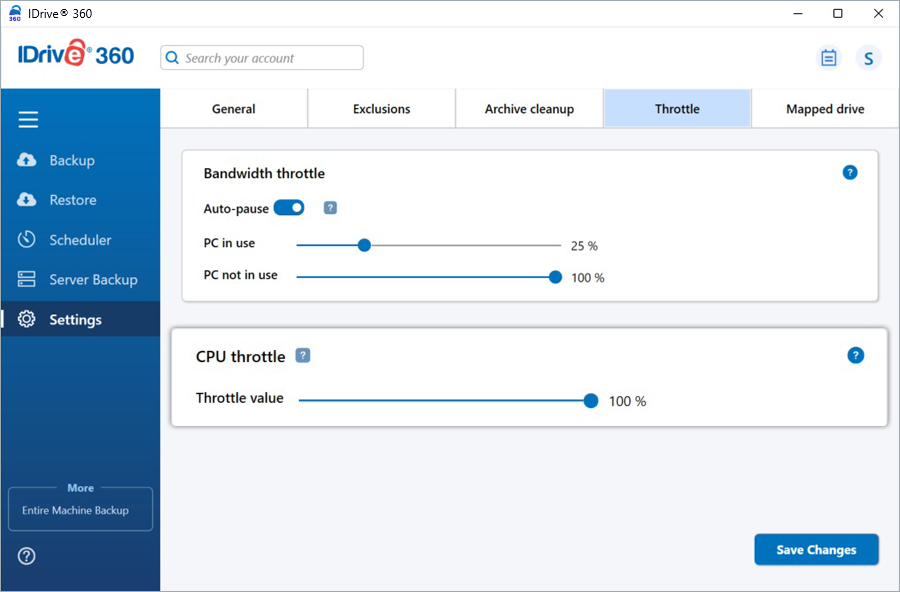
Note: CPU throttle feature will be available only for 'Windows 8/Windows Server 2012' and above Operating Systems.
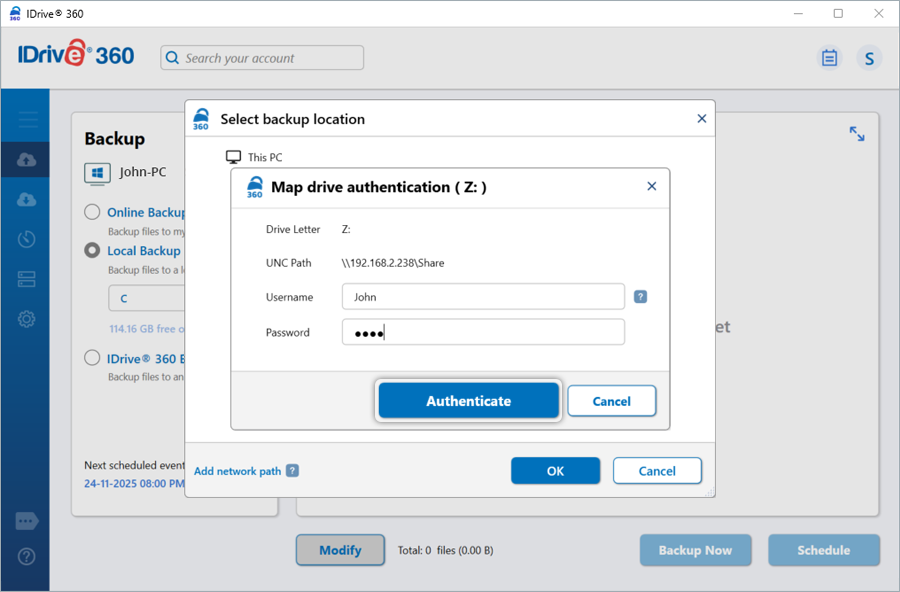
Can I back up Mapped/USB/External drives?
Yes, you can back up mapped, USB, and external drives using the IDrive® 360 desktop application. To ensure these drives are included in the backup, their contents must be part of the 'Backup Set' and accessible at the time of backup.
To back up a mapped drive,
- Sign in to the IDrive® 360 desktop application.
- Select the 'Online Backup' radio button.
- Click 'Modify' and select the mapped drive from the directory.
- Select the specific files and folders you want to include in the backup.
- Provide the authentication details and click 'Authenticate' to validate access.
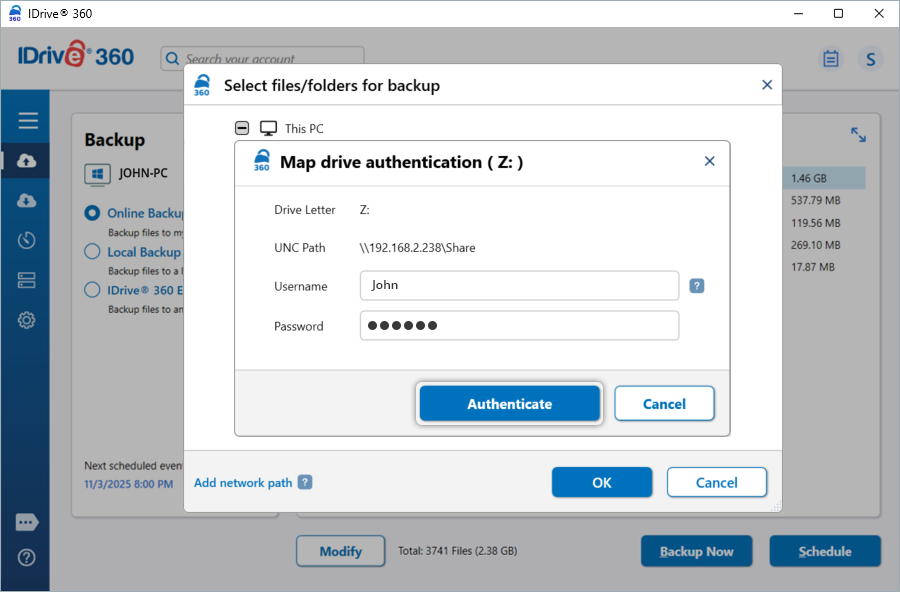
Note: The authentication prompt will appear only if authentication has been set up for the mapped drive, and only the first time it is accessed.
- Click 'Backup Now'.
How do I back up data to a mapped drive using the IDrive® 360 desktop application?
The IDrive® 360 desktop application supports local backups to external, USB, or mapped drives.
To back up your data to a mapped drive,
- Sign in to the IDrive® 360 desktop application.
- Go to the 'Backup' tab.
- Select the 'Local Backup' radio button.
- Click
 and select the mapped drive as the destination.
 - Provide the authentication details and click 'Authenticate' to validate access.
Note: The authentication prompt will appear only if authentication has been set up for the mapped drive, and only the first time it is accessed.
- Click 'Modify' to choose the files and folders you wish to back up.
- Click 'Backup Now'.
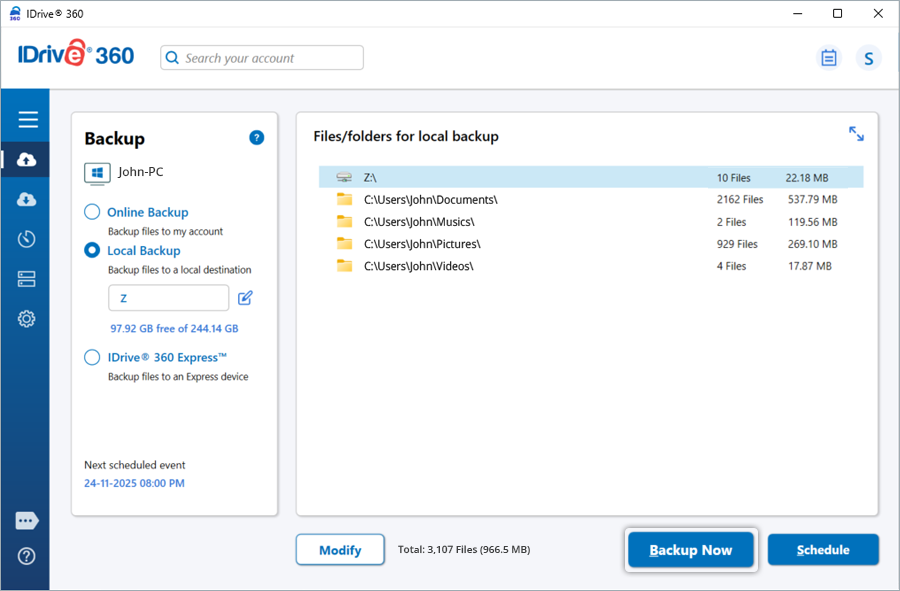
This process creates a local backup of your selected data on the mapped drive.
How do I update authentication credentials for a mapped drive?
If your mapped drive authentication details change, update the credentials in the IDrive® 360 desktop application to ensure continued access.
To update the credentials,
- Sign in to the IDrive® 360 desktop application.
- Go to 'Settings' > 'Mapped Drive'.
- Find the mapped drive you want to update.
- Update the username and password (or other required details).
- Click 'Verify Connection' to test the connection to the mapped drive.
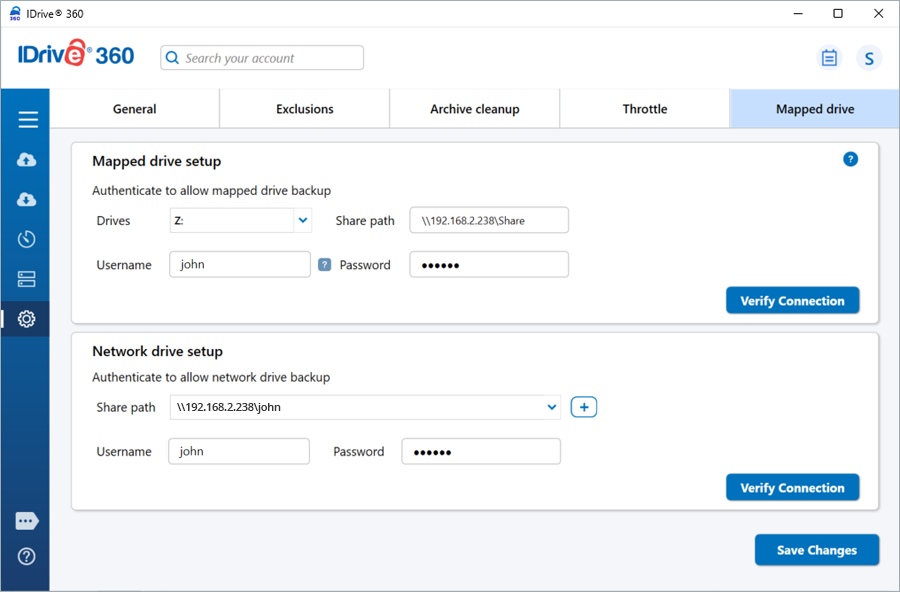
- Click 'Save Changes' to apply the updates.
How do I add a network path to my backup set?
To add a network path to your backup set,
- Sign in to the IDrive® 360 desktop application.
- Click the 'Modify' button to open the backup set.
- Click 'Add network path'.
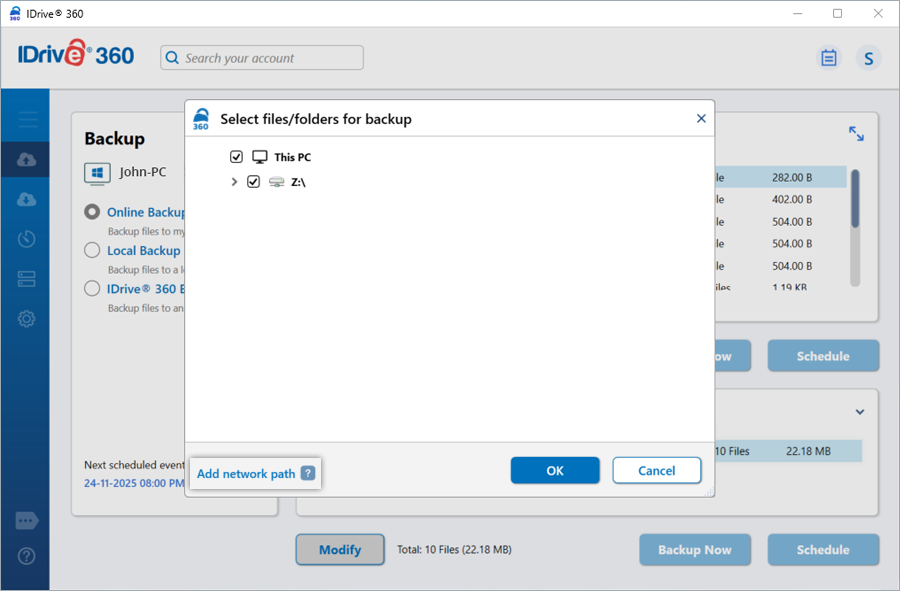
- The 'Network Details' popup appears.
- Enter the UNC path and the required credentials.
- Click 'Validate'.

- Select the required files or folders from the added network path to include them in your backup set.
- Click 'Backup Now' to initiate the backup.
Note: A network drive location can be selected as the backup destination for Local or Express backup only.
If your network drive authentication details change, you must update the credentials in the IDrive® 360 desktop application to ensure continued access.
To update the credentials,
- Sign in to the IDrive® 360 desktop application.
- Go to 'Settings' > 'Mapped drive'.
- Under the 'Network drive setup' section, add or locate the share path you want to update.
- Update the username and password.
- Click 'Verify Connection' to ensure the drive is accessible with the updated credentials.
- Click 'Save Changes' to apply the updates.
To add a network device, such as a NAS, as a mapped drive on your Windows 11 computer,
To update the credentials,
- Open File Explorer (Win + E).
- Click 'This PC' in the left pane.
- Click 'Map network drive' in the ribbon menu.
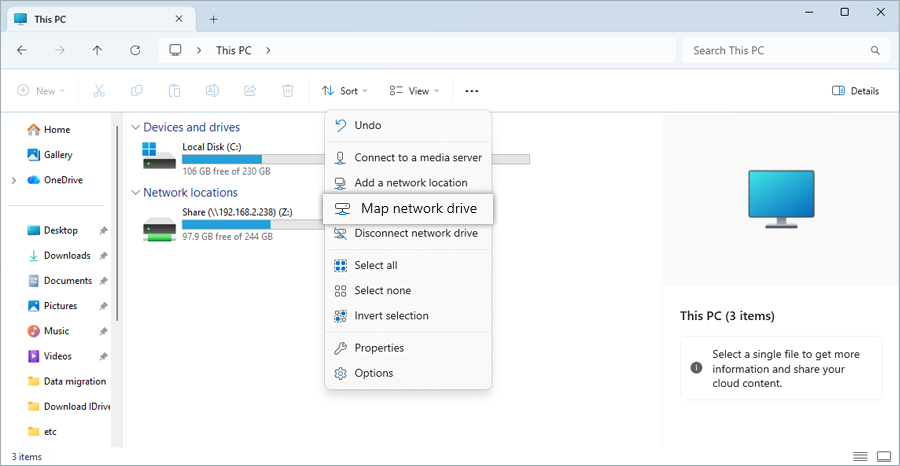
- In the popup, choose a drive letter (e.g., Z:).
- In the 'Folder' field, click 'Browse' and select the network path (e.g., \\Server\SharedFolder).
- Check 'Reconnect at sign-in' (if you want it to persist after reboot).
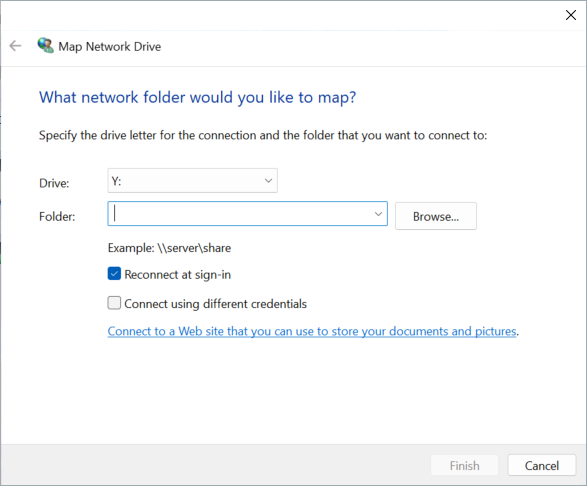
- Enter your NAS username and password.
- Click 'Finish' to complete the mapping.
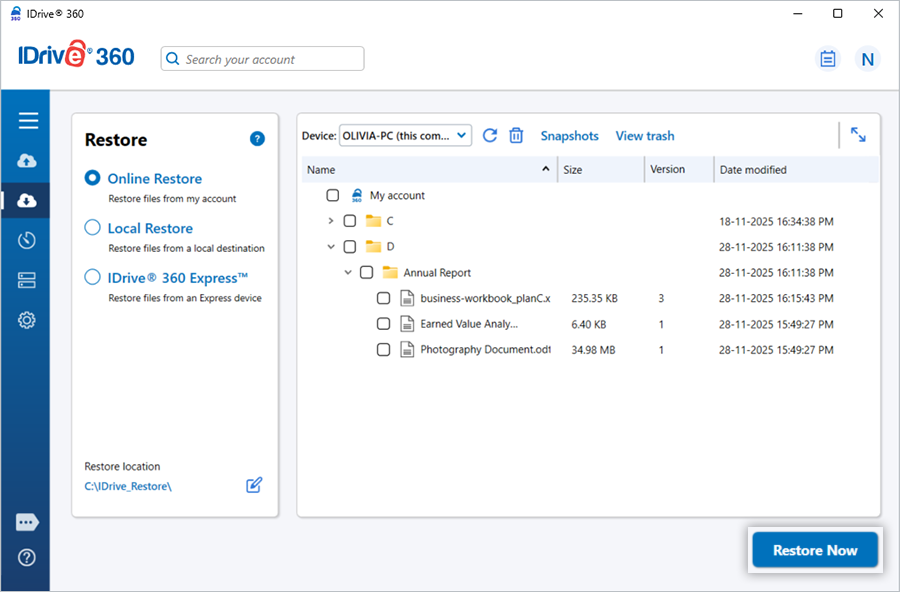
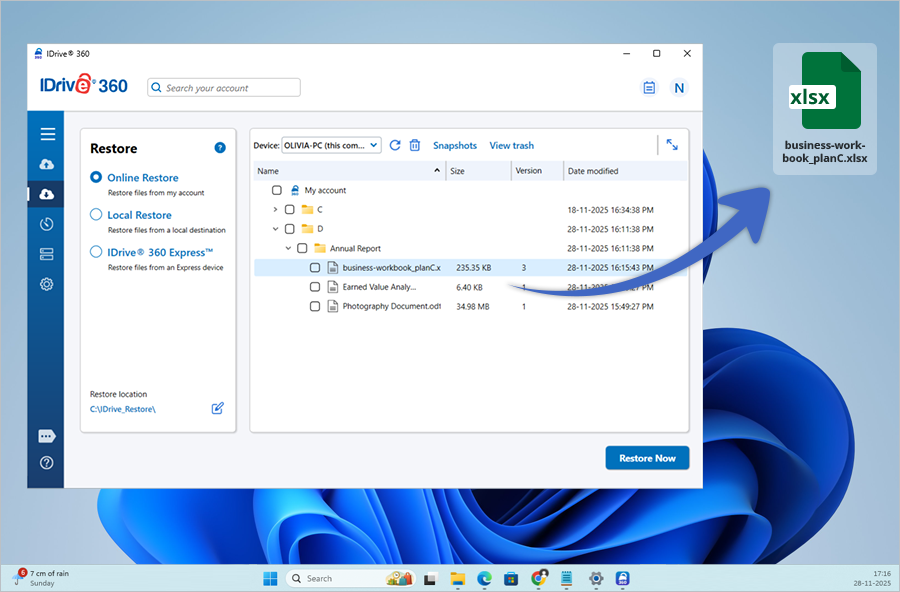
How do I restore my data after a system crash or on a new computer?
To restore data from your IDrive® 360 account to the local machine, follow the steps below:
- Download and install the IDrive® 360 desktop application.
- Sign in with your Username and Password. If you had set a private encryption key while signing in to the application for the first time, then provide the same.
- Go to 'Restore'.
- Select the 'Online Restore', 'Local Restore', or 'IDrive® 360 Express™' radio button.
- Select the files/folders to restore and click to choose the desired 'Restore location'.
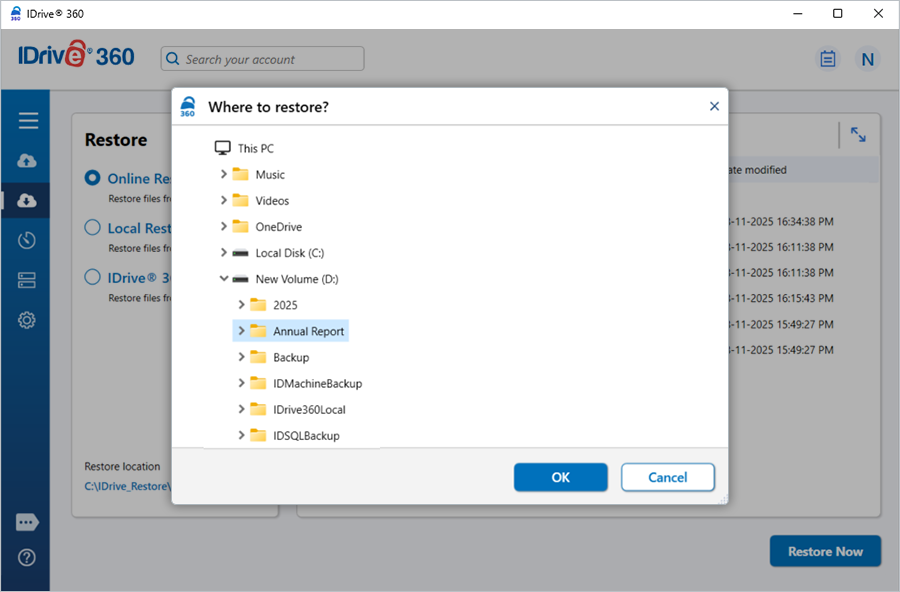
- Click 'Restore Now'.
How does 'Restore to original location' differ from a standard file restore?
The standard file restore lets you download files to a location you select. In contrast, 'Restore to original location' restores files to their original folder structure, placing each file in the same location on your computer as it exists in your cloud or local backup.
For example, if you choose to restore the file '/John-PC/D/Examples/ABC.txt' to its original location, the 'ABC.txt' file will be downloaded to a folder called 'Examples' in the 'D' drive of your computer.
Note: Data backed up from mapped drives and external drives cannot be restored using the 'Restore to original location' option.
To restore files to their original location, go to 'Restore' and select the 'Online Restore', 'Local Restore', or 'IDrive® 360 Express™' radio button. Select the 'Restore to the original location' checkbox and, on the pop-up that appears, click 'Restore'. Subsequently, to revert to file restore to a location selected by you, clear the checkbox, set your preferred 'Restore location', and click 'Restore Now'.
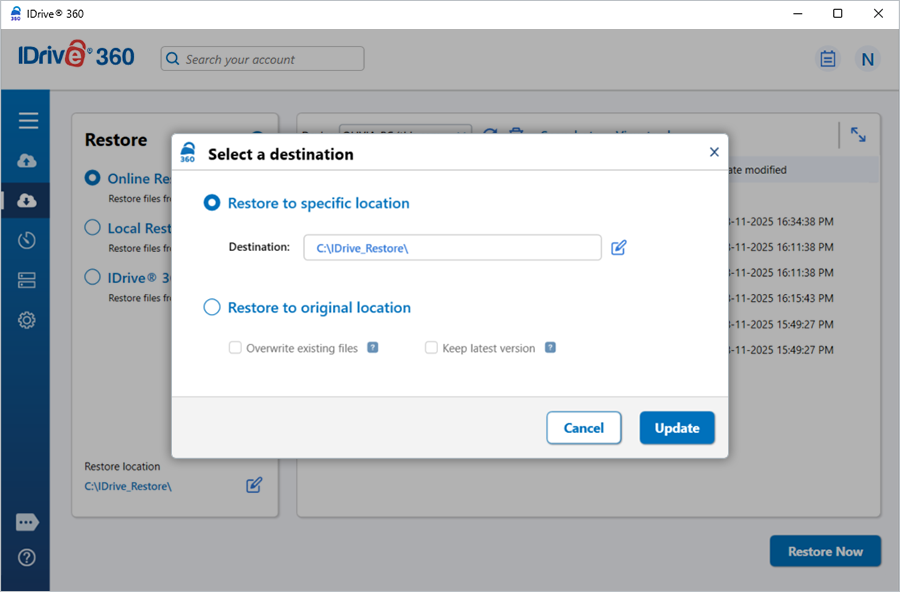
Note: Restoring to the original location overwrites the existing files with the latest file version available in your cloud backup or local backup. Before continuing with the restore operation, you will need to enter the one-time verification code sent to your registered email address to authorize your device as a trusted device.
Can I restore files backed up from external drives or mapped drives using the 'Restore to original location' option?
No, files backed up from mapped or external drives cannot be restored using the 'Restore to original location' option. To restore these files, select 'Local Restore' under Restore, choose the desired location, and click 'Restore Now'.
Can I use drag-and-drop to restore files from the IDrive® 360 desktop application?
Yes.
To drag-and-drop files, select the 'Online Restore' radio button under 'Restore'. Then drag the file or folder you wish to restore and drop it into the desired location on your computer.
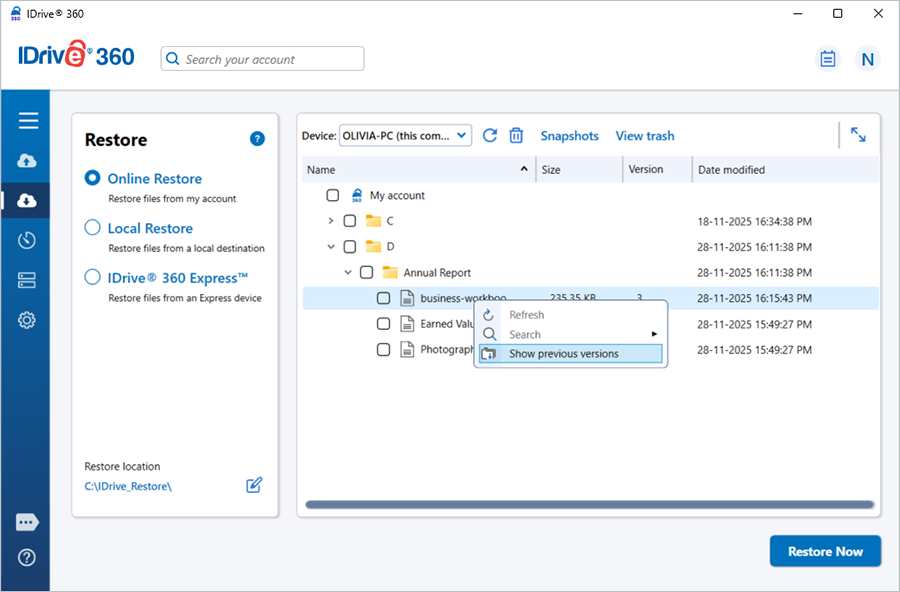
What is Versioning? Does it impact the available quota (storage space in my account)?
IDrive® 360 account retains previous versions of all files backed up to your account. You can restore up to 30 versions of a file, and recover them to any location on your local computer.
The additional storage for the previous versions has no impact on your account's quota, as your storage is calculated only for the most current version.
How do I view the versions of a file stored in my account?
To view the versions of a file stored in your account, go to 'Restore' and right-click the required file and select the 'Show previous versions' option from the list. You can also search for your desired file version.
To restore a particular version, select it from the displayed list, choose the desired restore location, and click 'Restore Now'.
How do I restore the latest version of a file in my account?
Under 'Restore', select the 'Online Restore' radio button. The most recently backed-up files will be listed.
To restore the latest version, select the desired file(s) or folder(s), choose the restore location, and click 'Restore Now'. You can also search for specific file(s)/folder(s) and restore them to your local system.
How do I delete backed-up data?
To delete files or folders from your backup, select the 'Online Restore', 'Local Restore', or 'IDrive® 360 Express™' radio button. The most recent backed-up files will be displayed.
Select the file(s)/folder(s) to delete and click  . Click 'Yes' in the confirmation popup to proceed.
The files/folders that are deleted from your IDrive® 360 account are moved to 'Trash'.
I have backed up data from multiple computers. How do I restore it?
To restore data backed up from multiple computers:
- Sign in to your IDrive® 360 account with your Username and Password.
- Go to 'Restore' and select the 'Online Restore' or 'Local Restore' radio button.
- Select the computer's name that you wish to restore. A list of file(s)/folder(s) backed up from the computer is displayed.
- Select the file(s)/folder(s) which you wish to restore.
- Choose your desired location on the local computer and click 'Restore Now'.
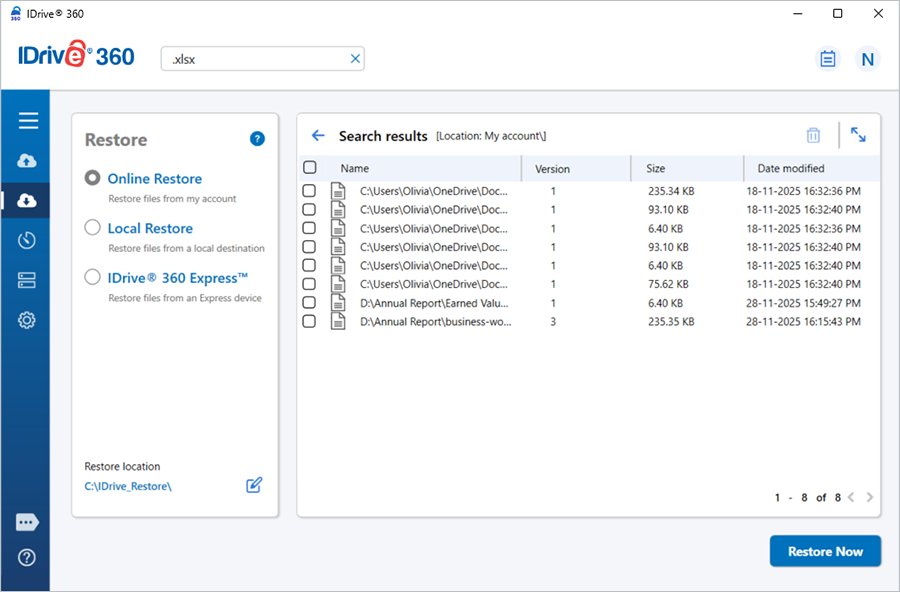
Can I search and restore a particular file from my IDrive® 360 account?
Yes, you can search and restore specific files from your IDrive® 360 account.
To search and restore files,
- Go to 'Restore' and select the 'Online Restore' radio button.
- Type the filename or a related string in the 'Search your account' field and press 'Enter'.
- From the search results, select the desired file, and click 'Restore Now'.
You can search and restore files from your local, Wi-Fi, and Express device by selecting 'Local Restore' or 'IDrive® 360 Express™' radio button.
You can delete the files or folders that appear in the search results by clicking .
To search and restore files from a specific folder, right-click on the desired folder and select the 'Search' option. Type the filename or a related string in the search field and press 'Enter'. From the search results, select the desired file, and click 'Restore Now'.
I can see a 'Snapshots' button on the Restore menu. What is it?
Certain accounts may see the feature 'Snapshots' in the application. A snapshot is a point-in-time capture of a file or folder, which allows you to perform point-in-time recovery in the future. With the IDrive® 360 snapshot feature, you can take a real-time image of a file/folder with all its contents and store it in your IDrive® 360 account. They are useful in case your files are corrupted by malware and you want to restore a previous version of the files.
To perform a snapshot-based restore,
- Go to 'Restore' and select the 'Online Restore' radio button.
- Click 'Snapshots'.
- Select the date and time and click 'Submit'. A list of all the data backed up on or before the selected date appears.
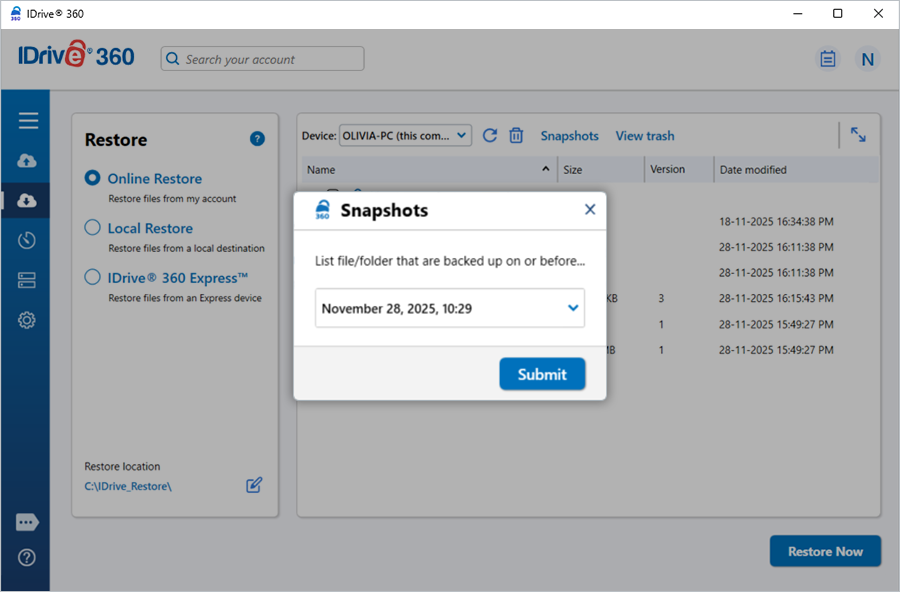
- Select the required files/folders and choose your desired restore location on the local computer.
- Click 'Restore Now'.
How do I restore the data backed up on a local drive or Express device?
To restore data from a local drive or Express device,
- Sign in to the IDrive® 360 desktop application.
- Go to 'Restore' and select the 'Local Restore'/'IDrive® 360 Express™' radio button.
- Select the required local drive or Express device to view all backed-up files and folders.
- If 'Local Restore' is selected, you can choose the required version from the 'Version' list.
- Select the file(s)/folder(s) to restore.
- Choose the desired 'Restore location'.
- Click 'Restore Now'.
Can IDrive® 360 desktop application back up my OneDrive folder?
Yes. IDrive® 360 can back up files stored locally on your computer. To include your OneDrive folder in the backup, ensure that OneDrive's 'Files On-Demand' feature is disabled so that all files are available locally.
To disable OneDrive's Files On-Demand feature,
- Click 'OneDrive' on your system tray and select 'Settings'.
- Go to 'Advanced settings' > 'Files On-Demand'.
- Click 'Download all files'.
- Go to 'Continue' in the popup to sync all OneDrive data to your computer.
Once the files are downloaded, add the OneDrive folder to your backup set. The next backup operation will back up the OneDrive folder.
Additionally, for Windows computers, you can choose the files and folders to back up from your OneDrive folder.
To back up selected files/folders in the OneDrive folder,
- Navigate to the 'OneDrive' icon on your system tray and select 'Open your OneDrive folder'.
- Select the desired folders/files you wish to back up.
- Right-click and select 'Always keep on this device'.
The next backup operation will back up these OneDrive files and folders.
Does IDrive® 360 desktop application support the backup of BitLocker-enabled drives?
Yes, the IDrive® 360 desktop application supports the backup of BitLocker-enabled drives. To back up a BitLocker-enabled drive, first unlock it using its password. Once unlocked, the drive becomes accessible to the operating system for authorized Windows users.
A gold-colored lock on the drive icon indicates that the drive is in a locked state.
To unlock the BitLocker drive,
- Right-click on the BitLocker drive and select 'Unlock Drive'.
- Enter the password.
- Click 'Unlock'.
The drive will be unlocked. A silver-colored open lock on the drive icon indicates the drive is ready for Windows operating system access. - Once the drive is unlocked and available for access, either perform an immediate backup or schedule a backup as per the requirements.
To turn off Bitlocker (Windows 10 and above),
- Log in as an administrator.
- Go to Start and enter BitLocker.
- Click 'Manage BitLocker'.
- In the BitLocker Drive Encryption menu, select 'Turn off BitLocker' for the required drives to proceed with the decryption process.
Does the IDrive® 360 desktop application perform scheduled backups in 'Standby' mode?
No. Remote access connections are automatically disconnected when the computer enters Standby mode, without prompting to disconnect manually. This applies to all remote access connections, including those to ISPs and private networks. This behavior is the default design of Windows.
Will the IDrive® 360 desktop application back up my data even if the computer is logged off?
Yes, the IDrive® 360 desktop application continues to perform scheduled backups even when the computer is logged off.
I am unable to open my Outlook email client during the backup of my Outlook PST files. I get an error indicating that the file may be in use. Why?
On Windows 2003 Server, Windows Vista, Windows 7, and Windows 8, this issue should not occur.
However, on other Windows operating systems, the IDrive® 360 desktop application may lock the Outlook client to ensure a successful backup of PST files. To resolve the issue, close Microsoft Outlook before starting the backup.
Will a missed scheduled backup run when the computer is restarted after the scheduled time?
Yes. The backup will start as soon as you restart your computer if the 'Start the missed scheduled backup when the computer is turned on' option is enabled in the Scheduler.
- If this option is not selected, the backup will run only if the computer is restarted within 30 minutes of the scheduled time.
- If restarted after 30 minutes, the backup will occur at the next scheduled time according to the previously set frequency.
Do I need to restart my computer after installing the IDrive® 360 desktop application?
No, restarting your computer is not required after installation.
Can the IDrive® 360 desktop application work with virtual machines?
Yes, the IDrive 360 desktop application works with virtual machines. For this, install the application on virtual machines and perform the backup as usual.
The Archive Cleanup feature permanently deletes data from your account that no longer exists in your current backup set. This one-to-one matching helps free up space in your account by removing obsolete files.
To run Archive cleanup,
- Go to 'Settings' > 'Archive cleanup'.
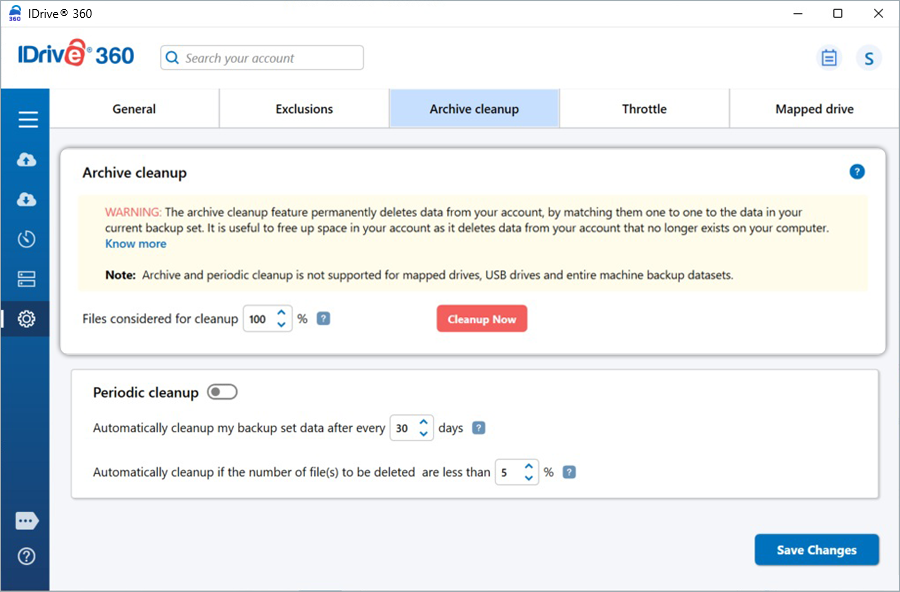
- Click 'Cleanup Now'. IDrive will generate a list of the items to be deleted from your account.
- Click 'Delete' to permanently remove data from your account.
Note:
- Archive Cleanup permanently removes data from your account that no longer exists on your computer, helping to free up storage space.
- You can adjust the percentage according to your preference. This percentage represents the portion of files considered for deletion from your account relative to the total number of files. Using this control helps prevent large-scale deletions due to unforeseen changes on your computer. For the most aggressive cleanup, set the percentage to 100%.
- Archive cleanup is not supported for mapped and USB drives.
- Empty folders must be deleted manually to remove them from your account.
- Archive cleanup is not supported for server backup and entire machine backup data sets.
Enable 'Periodic cleanup' to automate account cleanup at regular intervals. Periodic cleanup lets you set the frequency as well as the percentage of files to be considered. The frequency can be set to anything between 5 and 30 days; the percentage to anything between 5% and 50%. Periodic cleanup helps maintain a controlled amount of data in your account over time.
To enable periodic cleanup,
- Go to 'Settings' > 'Archive cleanup'.
- Enable 'Periodic cleanup' by turning on the toggle switch.
- Set the number of days and percentage of data to be considered for cleanup.
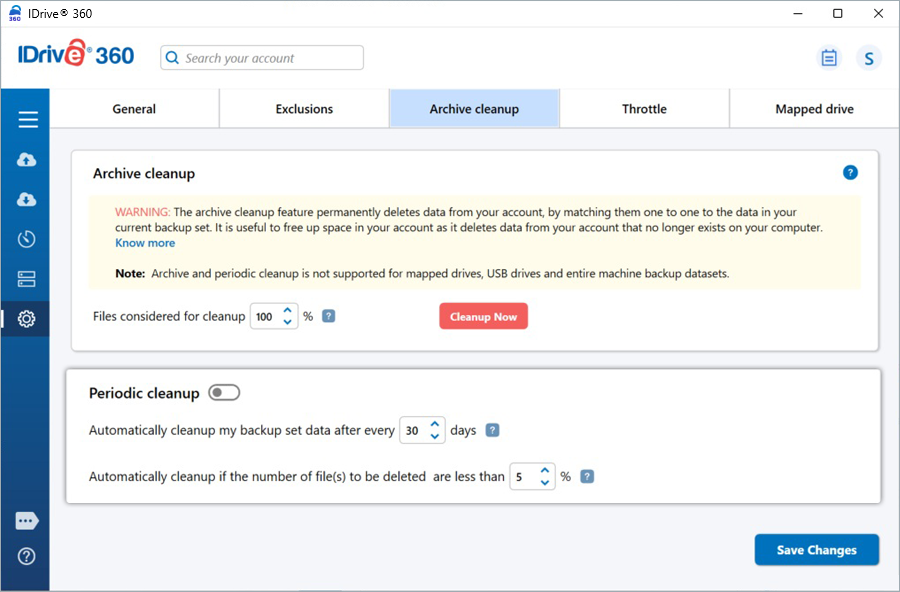
Note:
- Periodic cleanup may result in the automatic deletion of data from your IDrive® 360 account; use/set this option carefully.
- The percentage mentioned refers to files considered for deletion in your account as a percentage of the total number of files. The purpose of this percentage-based control is to avoid the large deletion of files in your account due to some unforeseen event on your computer.
- Periodic cleanup is not supported for mapped and USB drives.
I received an email warning about exceeding the quota limit. How do I adjust my account storage usage?
IDrive® 360 allows usage beyond the allocated quota to ensure backups continue without interruption. If usage exceeds your quota, you will receive periodic email warnings. To reduce your storage usage within the quota, you can:
- Archive Cleanup
- Periodic Cleanup
- Delete Files manually
Run an archive cleanup operation under 'Settings'. This immediately removes files that no longer exist on your computer from your account. Set the cleanup percentage to 100% for maximum effect.
Schedule periodic cleanup under Settings. This automatically removes files over time based on your selected options. Note that changes may not be immediate due to limits designed to prevent excessive deletion.
Remove files or folders directly from your account. Go to 'Restore' > 'Online Restore', select the files/folders, and delete them. After deletion, update your backup set to prevent these files from being backed up again.

After upgrading my OS to Windows 10, I am getting an error that the IDrive® 360 backup engine has stopped. What should I do?
If the IDrive® 360 backup engine stops, you need to restart it to resume backups and restores.
To restart the backup engine,
- Type 'services.msc' in the Run dialog box.
- Locate 'IDrive® 360 Service' in the list.
- Right-click it and select 'Start'.
I received a Windows SmartScreen message when attempting to install the IDrive® 360 desktop application.
The SmartScreen filter on Microsoft Edge does not recognize downloaded applications and prompts users to verify them during installations.
To disable SmartScreen Filter prompt on the browser,
- Launch Microsoft Edge.
- Go to 'Settings' > 'Privacy, search, and services' > 'Security' > 'Microsoft Defender SmartScreen'.
- Move the slider to disable mode. You can now download and install the IDrive® 360 desktop application.
Does the IDrive® 360 desktop application remove my account files when they are deleted from my computer?
No. Once files are backed up, they remain in your IDrive® 360 account indefinitely. Even if you delete them from your computer, they will not be removed from IDrive servers unless you delete them manually or use the automated Archive Cleanup process.
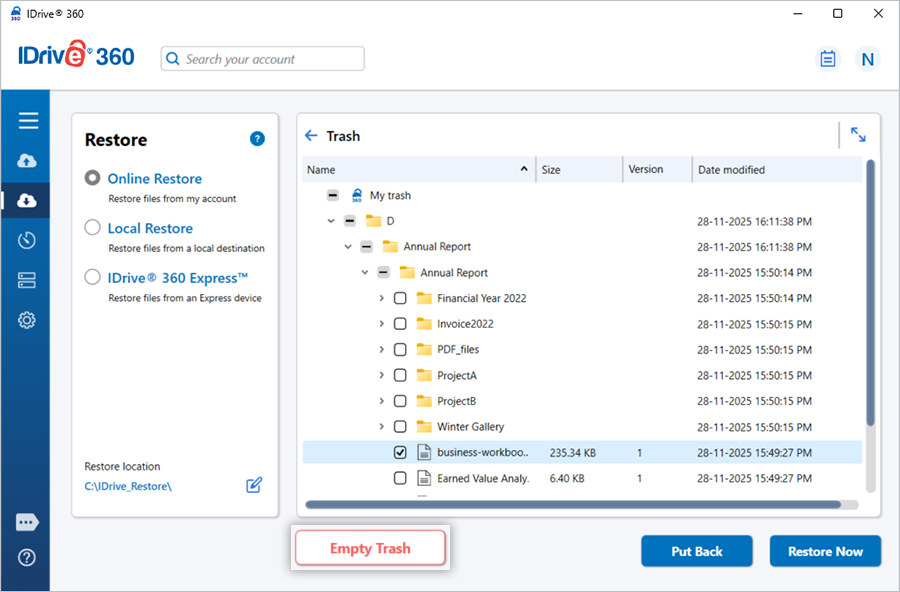
I deleted files from my IDrive® 360 account. Can I restore the files or folders that were accidentally deleted?
The files/folders that are deleted from your IDrive® 360 account are moved to 'Trash'. These files/folders will be automatically deleted after 30 days. You can either move your files/folders to the original location in your IDrive® 360 account or restore them to your local computer. For legacy IDrive® 360 accounts, deleted files/folders are permanently removed from the trash after 10 days.
To move/restore your files from trash,
- Under 'Restore' select the 'Online Restore' radio button.
- Click the 'View trash' button. The deleted files/folders are listed there with their latest version.
- Choose the files you want to move and click 'Put Back' to move the files/folders to the original location in your IDrive® 360 account.
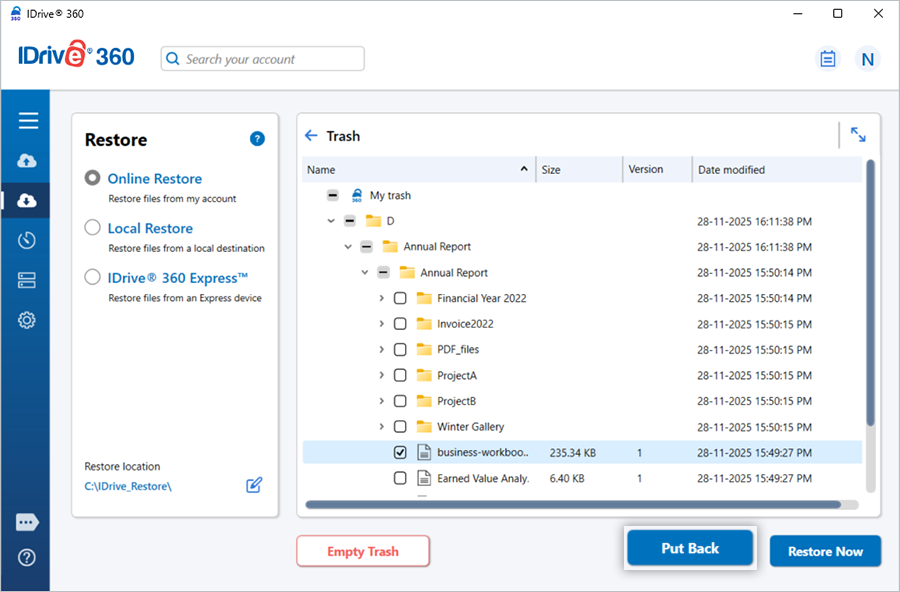
- Click 'Restore Now' to restore your files/folders to the desired location on your local computer.
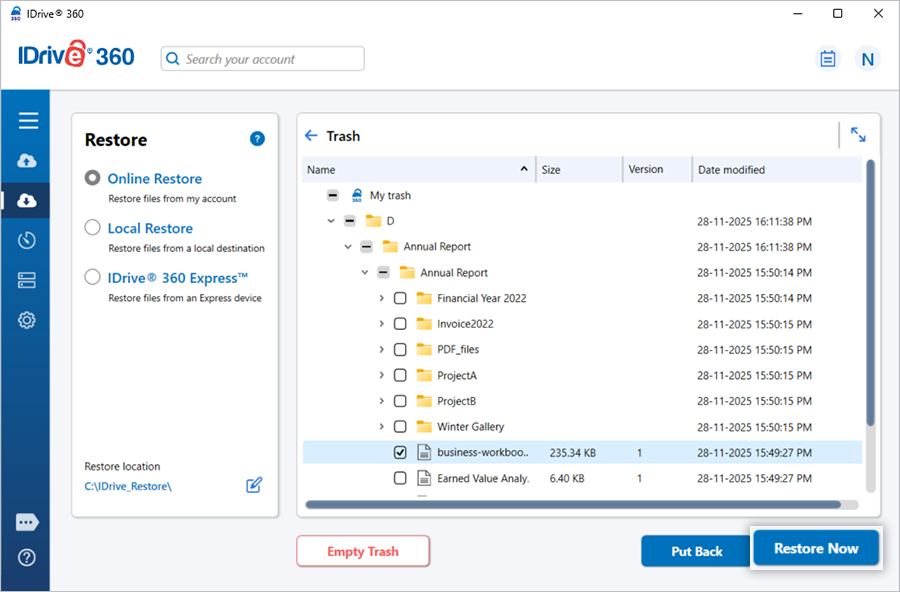
- Click 'Empty Trash' to permanently remove the deleted files.
If I keep on performing backups, will I use up my quota quickly?
IDrive® 360 does incremental backup (only the modified portion of your files/folders is sent to the IDrive servers). Your quota depends on the most recent file/folder copy backed up to your online account. The previous versions of files are stored for free.
Can I halt my backups at a particular time?
Yes. To enable this option, go to 'Scheduler' > select 'Backup set name' (DefaultBackupset / LocalBackupset/ ExpressBackupset ) > select the 'Cut-off time' check box and set your desired 'Cut-off time'. Click 'Save Changes'. The backup will resume at the next scheduled time from the point it was stopped.
Does IDrive® 360 support backup and restore of large files?
Yes. IDrive® 360 supports backup and restore of large files without any file size limits. Both the desktop application and web interface can be used, but we recommend the desktop application for optimal performance
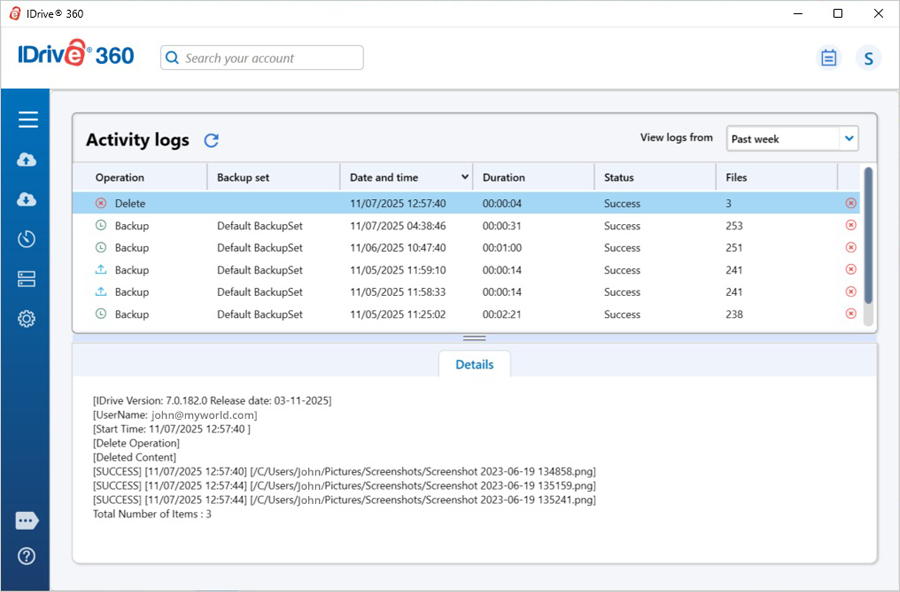
How do I view my backup/restore activities via the application?
Click the  icon on the IDrive® 360 desktop application main window to view all backup/restore activities in your account.
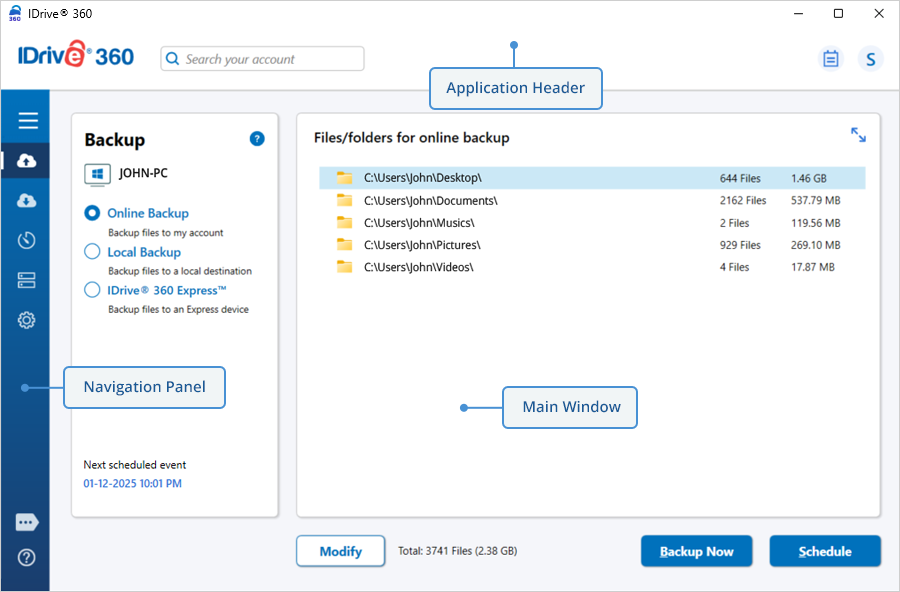
I need a walkthrough of the IDrive® 360 desktop application interface.
The IDrive® 360 desktop application interface consists of three sections: the application header, navigation pane, and main window.
Application header
The application header includes the search bar, account quota information, Upgrade button, Activity logs, and a username menu with access to the web console.
Navigation pane
The navigation pane comprises six functional sections:
- Backup- View and select file(s) and folder(s) to back up to your IDrive® 360 account.
- Restore- Displays all backed-up files and folders, allowing you to restore and search for specific items.
- Scheduler– Schedule your backups
- Server Backup- Back up all your databases and servers.
- Settings- Configure your IDrive® 360 account settings.
Main Window
The main window displays the contents corresponding to the section selected in the navigation pane.
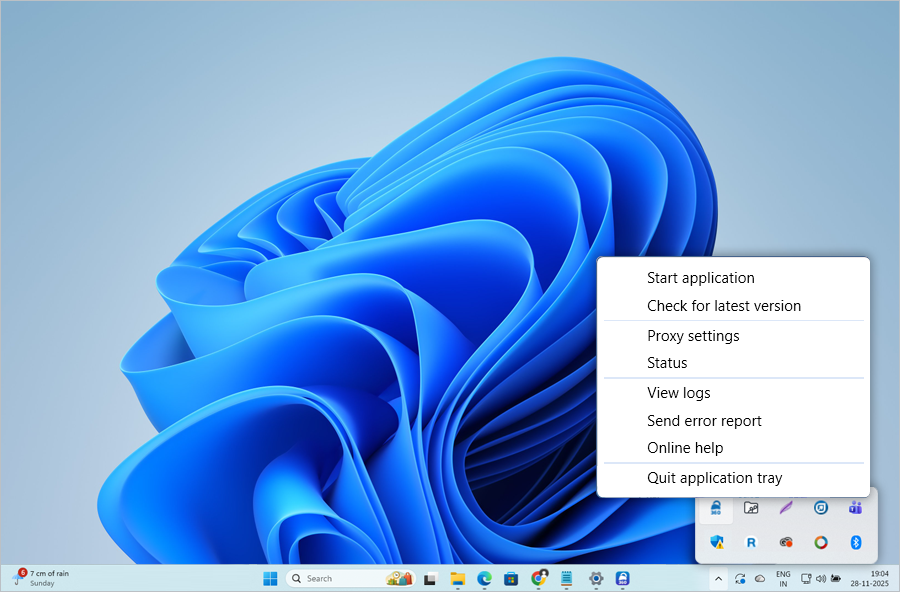
What options are available in the IDrive® 360 desktop application Tray?
When installed, the IDrive® 360 desktop application adds a tray icon to your system tray.
Right-clicking the IDrive® 360 desktop tray icon provides access to the following options:
Menu Options
- Start application: Start the IDrive® 360 desktop application.
- Check for latest version: This option provides updates for the latest version of the IDrive® 360 desktop application.
- Proxy settings: Configure the proxy settings to use the IDrive® 360 desktop application.
- Status: Displays the status of the next scheduled backup operation.
Note: The 'Status' option is available in the system tray only after you enable 'Use the full-suite desktop app' in 'Settings' on the web interface.
- View logs: Check the activity log reports of your operations.
- Send error report: Contact the IDrive® 360 support team for queries, suggestions, or feedback.
- Online help: Provides all information on the IDrive® 360 desktop application.
- Quit application tray: Closes IDrive® 360 desktop tray.
I am receiving a backup notification stating 'Success' even though the log details contain 'permission denied' error on files and folders. Why?
If your backup set contains files or folders with permission-denied errors, IDrive® 360 will back up all other accessible files/folders. The backup operation is marked as 'Success,' while the logs indicate which files/folders were skipped due to permission issues.
If I overwrite the IDrive® 360 desktop application with the latest version, will ongoing backups and restores be retained?
Ongoing backup and restore operations will be canceled if you overwrite the IDrive® 360 desktop application with a newer version. Make sure all operations are complete before installing the latest version.
How do I uninstall the IDrive® 360 desktop application from my computer?
To uninstall on Windows:
- Right-click 'Start' > 'Installed apps'.
- From the list, click
 next to 'IDrive 360', and select 'Uninstall'.
 - When the warning appears, click 'Uninstall', and then click 'Yes' to begin the process.
- In the Uninstall wizard, select the 'Remove the logs and configuration settings' checkbox to delete all associated data; if left unchecked, only the application will be removed.
Can I back up my open/locked files?
Yes, the IDrive® 360 application can back up open files on supported platforms by default. Supported platforms include: Windows 11, Windows 10, Windows 8.1, Windows 8, Windows 7, Windows 2019 Server, Windows 2016 Server, Windows 2012 Server, Windows 2008 Server, Windows Home Server, Windows 2003 Server (Service Pack 2).
Even if Microsoft Outlook, QuickBooks, Quicken, or other applications are open, the application reliably backs up the associated files.
Note: The Open File Backup feature does not support files on mapped or network drives.
CPU throttle lets you set the CPU usage for backups. You can change the CPU utilization to suit the workload of your computer.
To set the CPU throttle value for all linked PCs,
- Sign in to your IDrive® 360 account.
- In the 'Backup Console', go to the 'Settings' tab and click 'CPU Throttle'.
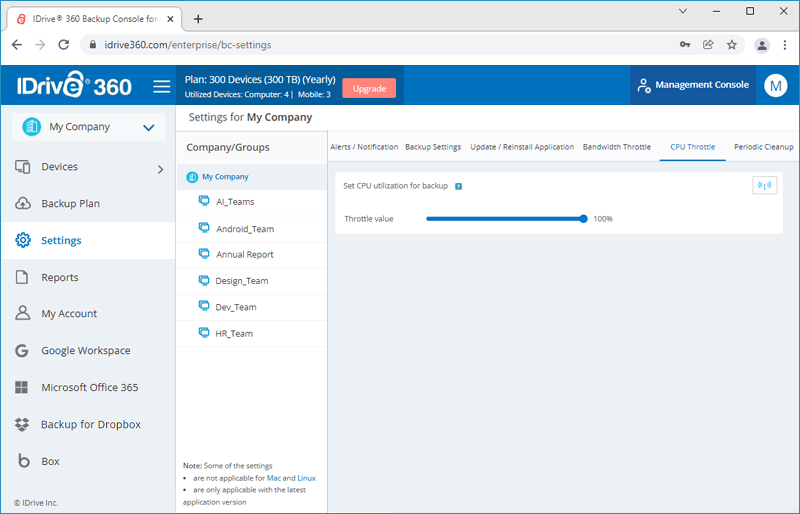
- Use the slider to set the CPU utilization limit and click
 .
. 
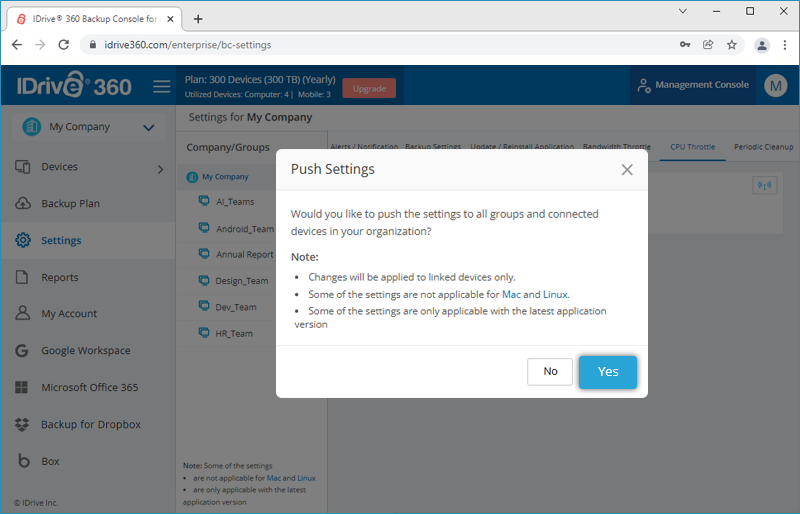
- Select your company name or choose 'Specific Group' to push the settings accordingly.
- Click 'Push' and click 'Yes' in the popup that appears.
To set the CPU throttle value for an individual PC,
- Sign in to your IDrive® 360 account.
- In the 'Backup Console' -> 'Devices' tab, click on the required computer. Or hover over a computer name, click
 , and select 'Remote Management'.
- Go to the 'Settings' tab and navigate to 'CPU Throttle'. By default, CPU Throttle is set at 100%.
- Use the slider to set the CPU utilization limit for backups.
- Click 'Save Settings'.
Note: The CPU Throttle feature is available only on Windows 8 and later, and Windows Server 2012 and later editions.